The documentation you are viewing is for Dapr v1.10 which is an older version of Dapr. For up-to-date documentation, see the latest version.
IntelliJ
开发 Dapr应用程序时,你通常使用 Dapr CLI 来启动你的 Dapr 服务,就像这样:
dapr run --app-id nodeapp --app-port 3000 --dapr-http-port 3500 app.js
这使用了默认的组件yaml文件(在dapr init上创建),这样你的服务就可以与本地Redis容器交互。 作为一个入门方法这很好用,但是如果你想要附加一个调试器到你的服务来进行代码调试呢? 在这里你可以使用dapr cli而不需要调用app。
将调试器附加到服务中的一种方法是首先从命令行运行dapr run --,然后运行你的代码并附加调试器。 虽然这完全是一个可以接受的解决方案,但它也需要一些额外的步骤(比如在终端和IDE之间进行切换),以及对那些可能想要克隆你的仓库并点击 “play “按钮开始调试的开发人员进行一些指导。
本文档介绍了如何从IntelliJ中直接使用dapr。 作为前提条件,要确保你已经通过dapr init初始化了Dapr的开发环境。
让我们开始吧!
添加Dapr作为 “External Tool”
首先,退出IntelliJ后再修改配置文件。
IntelliJ配置文件位置
对于2020.1及以上版本,工具的配置文件应该位于:
%USERPROFILE%\AppData\Roaming\JetBrains\IntelliJIdea2020.1\tools\
$HOME/.config/JetBrains/IntelliJIdea2020.1/tools/
~/Library/Application Support/JetBrains/IntelliJIdea2020.1/tools/
2019.3或更早版本的配置文件位置不同, 更多详情请参见这里。
如有需要,请更改路径中的IntelliJ版本。
创建或编辑<CONFIG PATH>/tools/External\ Tools.xml中的文件(如有需要,请更改路径中的IntelliJ版本)。 如上所述,<CONFIG PATH>是操作系统依赖的。
添加一个新的 <tool></tool>条目:
<toolSet name="External Tools">
  ...
  <!-- 1. Each tool has its own app-id, so create one per application to be debugged -->
  <tool name="dapr for DemoService in examples" description="Dapr sidecar" showInMainMenu="false" showInEditor="false" showInProject="false" showInSearchPopup="false" disabled="false" useConsole="true" showConsoleOnStdOut="true" showConsoleOnStdErr="true" synchronizeAfterRun="true">
    <exec>
      <!-- 2. For Linux or MacOS use: /usr/local/bin/dapr -->
      <option name="COMMAND" value="C:\dapr\dapr.exe" />
      <!-- 3. Choose app, http and grpc ports that do not conflict with other daprd command entries (placement address should not change). -->
      <option name="PARAMETERS" value="run -app-id demoservice -app-port 3000 -dapr-http-port 3005 -dapr-grpc-port 52000" />
      <!-- 4. Use the folder where the `components` folder is located -->
      <option name="WORKING_DIRECTORY" value="C:/Code/dapr/java-sdk/examples" />
    </exec>
  </tool>
  ...
</toolSet>
你也可以为一个可以在多个项目中复用的sidecar工具创建一个新条目:
<toolSet name="External Tools">
  ...
  <!-- 1. Reusable entry for apps with app port. -->
  <tool name="dapr with app-port" description="Dapr sidecar" showInMainMenu="false" showInEditor="false" showInProject="false" showInSearchPopup="false" disabled="false" useConsole="true" showConsoleOnStdOut="true" showConsoleOnStdErr="true" synchronizeAfterRun="true">
    <exec>
      <!-- 2. For Linux or MacOS use: /usr/local/bin/dapr -->
      <option name="COMMAND" value="c:\dapr\dapr.exe" />
      <!-- 3. Prompts user 4 times (in order): app id, app port, Dapr's http port, Dapr's grpc port. -->
      <option name="PARAMETERS" value="run --app-id $Prompt$ --app-port $Prompt$ --dapr-http-port $Prompt$ --dapr-grpc-port $Prompt$" />
      <!-- 4. Use the folder where the `components` folder is located -->
      <option name="WORKING_DIRECTORY" value="$ProjectFileDir$" />
    </exec>
  </tool>
  <!-- 1. Reusable entry for apps without app port. -->
  <tool name="dapr without app-port" description="Dapr sidecar" showInMainMenu="false" showInEditor="false" showInProject="false" showInSearchPopup="false" disabled="false" useConsole="true" showConsoleOnStdOut="true" showConsoleOnStdErr="true" synchronizeAfterRun="true">
    <exec>
      <!-- 2. For Linux or MacOS use: /usr/local/bin/dapr -->
      <option name="COMMAND" value="c:\dapr\dapr.exe" />
      <!-- 3. Prompts user 3 times (in order): app id, Dapr's http port, Dapr's grpc port. -->
      <option name="PARAMETERS" value="run --app-id $Prompt$ --dapr-http-port $Prompt$ --dapr-grpc-port $Prompt$" />
      <!-- 4. Use the folder where the `components` folder is located -->
      <option name="WORKING_DIRECTORY" value="$ProjectFileDir$" />
    </exec>
  </tool>
  ...
</toolSet>
创建或编辑运行配置
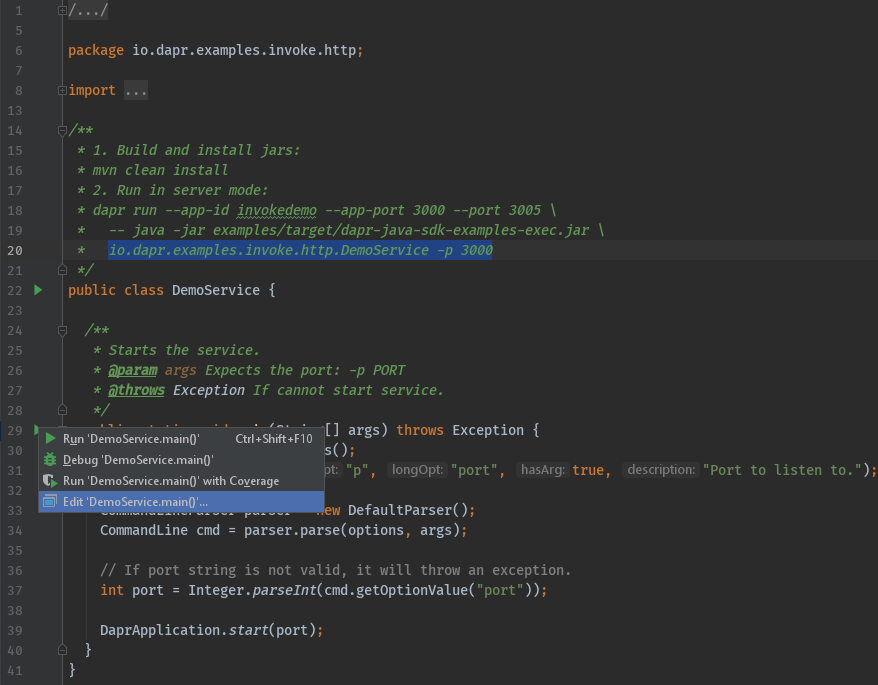
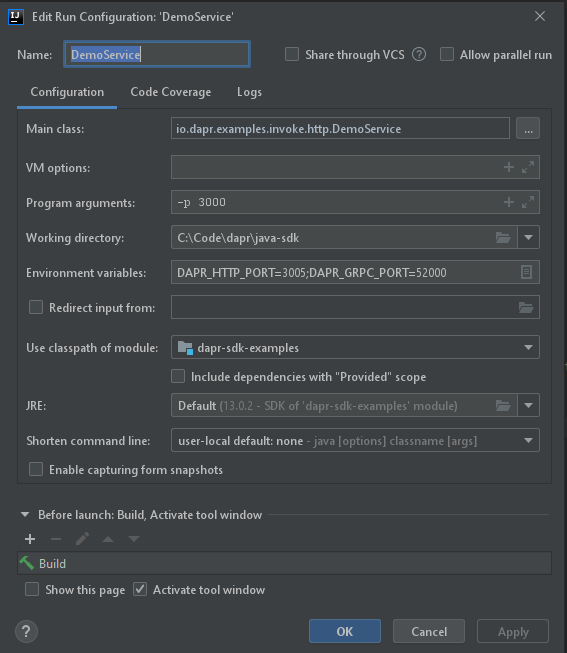
现在,为要调试的应用程序创建或编辑运行配置。 它可以在main()函数旁边的菜单中找到。

现在,添加程序参数和环境变量: 这些端口需要与上面 “External Tool “条目中定义的端口相匹配。
- 本例的命令行参数:
-p 3000 - 本例的环境变量:
DAPR_HTTP_PORT=3005;DAPR_GRPC_PORT=52000

开始调试
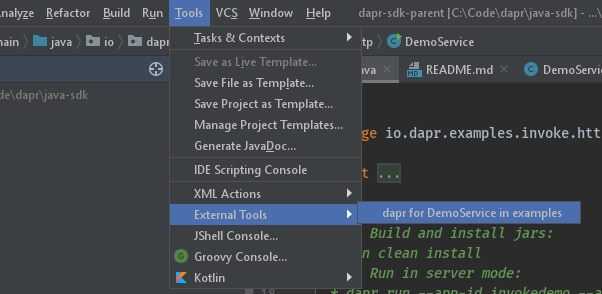
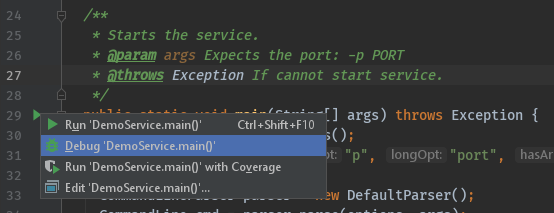
以上一次性配置完成后,在IntelliJ中使用Dapr调试Java应用程序需要两个步骤:
- 通过 IntelliJ 中的
Tools->External Tool启动dapr。

- 在调试模式下启动你的应用程序。

收尾
调试之后,你要确保同时停止了dapr和你在IntelliJ中的应用。
由于你使用 dapr run CLI 命令启动服务。 dapr list命令将在当前使用Dapr运行的应用程序列表中显示IntelliJ的运行情况。
调试愉快!
相关链接
Feedback
Was this page helpful?
Glad to hear it! Please tell us how we can improve.
Sorry to hear that. Please tell us how we can improve.